September 2008 - Performance Zone
CAT ENGINE REBUILD PART 3
By Performance Specialist Bruce C. Mallinson
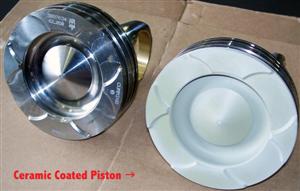
In my last few articles we have been going over the basics of rebuilding a Cat 3406-E and C-15 engine. We have already discussed installing the cylinder liners, proper liner protrusion, the benefits of ceramic and Teflon coated pistons, and how to install the piston on the connecting rod. This month we’ll cover installing the piston and rod assemblies, camshaft, head, injectors and rocker arm assemblies.
Let’s start with installing the piston and rod assemblies into the liner. First off, do not forget to install the piston rings on the piston. After that, we begin by setting the piston on top of a large vice. Allow the connecting rod to hang straight down. Be sure to protect the rod with several rags from the jaws of the vice. Never put a dent in the connecting rods or allow them to get a coating of rust on them. Coat the pistons and rings with Lucas 20W-50 racing oil (or some other good 20W-50 oil) and install the piston assembly into a piston ring compressor. The Porta-Tool Piston Ring Compressor is the tool of our choice. Before sliding the piston and rod assembly into the cylinder liner, coat the liner with the 20W-50 racing oil.
Now it’s time to install the spacer plate and plate gasket, and then check the liner protrusion. As you look down on the engine you will notice there are two sets of head bolt holes running parallel with the engine block. Install fourteen (14) 3/4” fine thread bolts that are 3” long, with hardened washers, and torque them to 100 ft. lbs. These bolts will put pressure on the liners and spacer plate so you can check the liner protrusion before proceeding. Make sure you have .005 to .006 liner protrusion – and you will if you have properly cut the block, installed the correct shims and used the correct spacer plate.
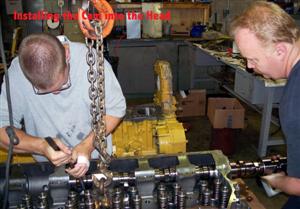
Next we will install the cam into the head. Coat the cam bearings with Lubriplate Motor Assembly Grease or Lucas Oil Stabilizer, then slide the cam into the bearings. After you have gone through a couple bearings, use a leather strap or belt (or anything else that won’t mark the cam) to hold up the cam as you guide it through the bearings. Now, remove the 14 bolts we put in earlier to check the liner protrusion. When that is done, wipe off the head and spacer plate with brake cleaner to remove any finger prints, grease and/or oil.
 Now we’re ready to install the head gasket and then gently lower the remanufactured Cat head onto the engine. The head bolts should have already been cleaned and inspected for stretch marks, pitting or rust (replace any bolts that show signs of any of these problems). Stand the head bolts up on newspaper and spray them with never-seize. We use CRC’s copper-based never-seize, but any never-seize product in a spray can will work. The never-seize lubricates the threads so when you are tightening the head bolts they won’t creak. It will also protect the shank of the bolt against pitting if antifreeze ever leaks and works its way up the bolt. Use the engine manual pertaining to your engine for the proper torque and tightening sequence. I like to go over the bolts at lease two times after they are torqued down just to make sure they did not stretch.
Once the head is secured into place, it’s time to start installing the injectors and rocker arm assemblies. Coat the injector O-rings with Lucas Oil Stabilizer and insert them into the head, being careful to center the body of the electromagnet between the valve springs. Cat recommends installing new injector hold down bolts because of stretching, and since the cost of the new bolts is only about $1.00 each, you should replace them. You’ll want to torque them down to 47 ft. lbs. When installing the rocker arm assemblies, do not use an air gun to tighten them down. Always hand tighten the rocker arm assemblies because several of the intake and exhaust valves must be pushed open, depending on the position of the camshaft. You want to load the rocker arm assemblies gently to a final torque of 80 ft. lbs. Refer to your engine rebuilding manual for the setting and procedure of the back lash for the cam gear.
We are almost done with our Cat engine rebuild. Next month we will finish it off. I hope this “back to the basics” series has been helpful. If you have any performance-related comments or questions, I can be reached through e-mail at bruce@pittsburghpower.com or by calling Pittsburgh Power in Saxonburg, PA at (724) 360-4080.
