August 2008 - Performance Zone
BASIC ENGINE REBUILDING
By Performance Specialist Bruce C. Mallinson
Last month we discussed proper liner protrusion and why head gaskets fail. Now let’s talk about basic engine rebuilding. Did you know that a crankshaft will bend after several years of service? All crankshafts bend and all engine blocks eventually bow. The last 6NZ Cat we rebuilt had a crank that was bent .006, which means that the block line bore was also warped about the same. A good diesel engine machine shop can fix a bent crank and/or block fairly easily, but let’s talk about why some engines fail and cover some basic engine rebuilding procedures.
One of the main reasons that engines fail today is because of neglected cooling systems. Most of the newer trucks no longer have a water filter mounted on the engine or frame rail. I have no idea why this device was eliminated. When the water filter was right there, it reminded you to change it at every oil change. Now, with the new permanent antifreeze, people have been told they do not need to do anything to the cooling system. I’m not an antifreeze expert so I have asked Kevin Rutherford to research the subject and talk about it on his XM Radio show, but I can illustrate what cooling system neglect can do to your engine.
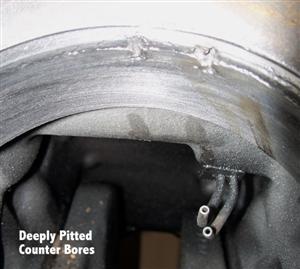
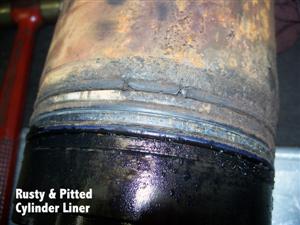
A neglected cooling system will allow rust to accumulate in your engine (the picture of the rusty cylinder liner clearly shows that). This liner was almost ready to rust through and the lower counter bores of the block, where the O-rings seal, were severely pitted. The pitting was so deep that the machine shop had to install five lower counter bore sleeves. This block also had to be resurfaced, which was okay being that it came from a heavy haul truck and had 805,834 miles on it. In the picture you can also see where the top O-ring has been eaten through by rust and how the liner has been pitted. Also, notice the other picture of the lower counter bore and the two piston oil cooling nozzles. Can you see the deep pitting in the counter bores? That is the result of a neglected cooling system. This problem is repairable, but it is an expensive job and the block must come out of the chassis. This damage could have been avoided if the truck had been equipped with a water filter that was changed regularly. The cost to repair this block was $3,576 – which included repairing the crankshaft.
 Whenever a block and/or crank comes back from the machine shop, we always wash them with solvent. Even though the machine shop does an excellent job of cleaning, it only takes a few leftover metal shavings to ruin a great rebuild, so cleaning again is time well spent. Last month we talked about cutting the upper counter bores and setting the liner protrusion to .006 (even though the book calls for .0015 to .005). Low liner protrusion will result in a premature head gasket failure, and, not surprising, the Cat engine in these pictures had a blown head gasket. Once the upper counter bores are cut and the proper shims are installed to set the liner protrusion to .006 (.007 on an NTC or N-14 Cummins), we are ready to install the liners.
When putting the O-rings on the liner, make sure you have the proper O-ring in the correct groove. Walk the O-ring into place with your fingers (do not roll it). Put a long thin screwdriver between the ring and the liner and run it around the liner several times to allow the O-ring to untwist and lay flat against the liner. Always install O-rings dry – it is the dry spot that keeps the O-ring in place when installing the liner into the block. There is a line around the outside of the O-ring that must be visible all the way around the liner. If the O-ring is twisted it will create a hard spot and the piston will score the liner when the engine is working hard.
Liner packing, correct preparation of the block and proper installation of the liners is critical for long engine life. We lubricate the O-rings and liners with 20W50 racing oil or Lucas Oil Stabilizer. Lubricate only one liner at a time and then slide it into the engine block immediately because the oil will cause the O-ring to swell (which it is supposed to do to seal the lower counter bore tight). If you ever have to remove a liner once it’s been in the block for several minutes, you may have to replace one of the O-rings. As you can see, it is very important to set and check the liner protrusion before installing the liner O-rings.
Once the liners are in place, we can start working on the pistons. The electronic engines with steel top pistons have enough clearance so the piston pin will slide right into the piston, but on engines with aluminum pistons, you must heat a steel bucket of water and put the piston in the hot water for several minutes to expand the piston pin hole. Coat the wrist pin with Lubriplate Engine Assembly Lube 130-AA. Remove the piston from the hot water with large pliers and then hold the connecting rod in place. Slide the pin through the piston and the rod and then install the snap rings to hold the pin in place. You must install the snap rings quickly or you will not be able to move the pin once the heat from the piston gets to the pin. Keeping the piston pins in a cool place will help. Remember, this procedure is only for aluminum pistons – the steel top pistons have a free floating pin and do not need to be heated.
Caterpillar Cylinder Packs come with the rod on the piston and the piston in the liner, but we ceramic coat the top of the pistons to reflect the heat into the combustion chamber and Teflon coat the skirts to help the piston slide smoother in the liner. These additional procedures require us to disassemble the cylinder packs and then reassemble them after the work is completed. Next month we will start with the installation of the pistons into the liners. If you have any comments or questions, I can be reached at Pittsburgh Power in Saxonburg, PA at (724) 360-4080 or via e-mail at bruce@pittsburghpower.com.
